Trong phần 2, mình sẽ hướng dẫn 2 bước còn lại là tô màu xung quanh vị trí làm lõm và update lại collider cho mesh.
Tô màu xung quanh vị trí làm lõm
Có nhiều cách để tô màu lên texture trong real time. Tuy nhiên, để sử dụng được trên low-end device thì không có nhiều cách có thể thực hiện. Trong bài viết này, mình sẽ hướng dẫn cách sử dụng RenderTexture.
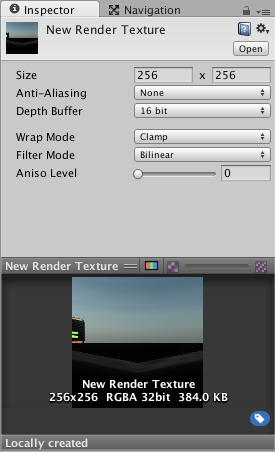
RenderTexture là một loại Texture đặc biệt cho phép tạo và update runtime. Để sử dụng nó, bạn cần tạo và chỉ định một camera render vào nó. RenderTexture hiển thị những gì camera (mà nó gắn vào) render ra trong real time.
 Để làm được điều này, chúng ta cần thực hiện 2 việc:
- Tìm toạ độ uv map của texture terrain dựa trên điểm va chạm.
- Tô màu lên texture lúc runtime dựa trên RenderTexture.
1. Tìm toạ độ uv map dựa trên điểm va chạm Đầu tiên, bạn cần tạo một RenderTexture. Tại Project, chuột phải chọn Create và tìm đến phần RenderTexture. Để sử dụng RenderTexture, chúng ta sẽ cần một Camera thứ 2 để chỉ định render vào nó. Chúng ta sẽ sử dụng một Camera với phép chiếu trực giao (orthographic projection). Tại Component Camera, gắn RenderTexture vào mục Target Texture. Tạo một empty Gameobject và gán script PaintingTexture.cs:
public Camera canvasCam; private Vector2 uvCoord; private bool HitTestUVPosition(ref Vector3 uvWorldPosition) { if (uvCoord != Vector2.zero) { uvWorldPosition.x = uvCoord.x - canvasCam.orthographicSize;//To center the UV on X uvWorldPosition.y = uvCoord.y - canvasCam.orthographicSize;//To center the UV on Y uvWorldPosition.z = 0.0f; return true; } else return false; } public void SetUVCoordCollider(Vector2 _uvCoord) { uvCoord = _uvCoord; }
Hàm HitTestUVPosition() sẽ trả về toạ độ uv map từ toạ độ uv của texture tại nơi va chạm. Quay trở lại script PhysicsDeformer.cs, chúng ta sẽ viết tiếp code để tính toán toạ độ uv của texture tại nơi va chạm:
private void OnCollisionEnter(Collision collision) { if (collision.gameObject.CompareTag("Terrain")) { ContactPoint[] contacts = collision.contacts; foreach(ContactPoint contact in contacts) { deformableMesh.AddDepression(contact.point, collisionRadius); } Vector3 minusNormal = collision.contacts[0].normal; minusNormal.y = -collision.contacts[0].normal.y; Ray ray = new Ray(collisionTerrainPoint + collision.contacts[0].normal * 0.01f, minusNormal); RaycastHit hit; if (Physics.Raycast(ray, out hit, 10f, LayerMask.GetMask("Terrain"))) { paintScript.SetUVCoordCollider(hit.textureCoord); } } }
2. Tô màu lên texture runtime dựa trên RenderTexture
Kéo texture của Terrain vào phạm vi render của orthogaphic Camera, scale nó sao cho kích thước của nó vừa bằng phạm vi render của orthographic Camera.
Tạo một empty Gameobject, đặt tên là "BrushContainer", sau đó kéo nó ở giữa camera và texture của Terrain. Gameobject này sẽ là nơi chứa các gameobject màu mà chúng ta sẽ tô lên Terrain như hình sau:
 Để tô màu lên texture, chúng ta sẽ sử dụng 1 sprite như một brush, và tạo các brush tại vị trí uv map chúng ta đã lấy được bên trên. Các brush sẽ là các object con của BrushContainer. Khi camera render lên RenderTexture, các brush sẽ nằm đè lên texture và kết quả của RenderTexture sẽ giống như trong Camera Review chúng ta nhìn thấy ở hình ảnh trên.
Để thấy được kết quả, bạn hãy gán RenderTexture tại material của Terrain.
Các bạn có thể tải brush hoặc tìm kiếm các hình ảnh tương tự.
Tải hình brush
Kéo hình ảnh brush vào scene và tạo prefab cho nó, sau đó xoá hình ảnh brush trên. Chúng ta sẽ tạo brush từ prefab đó. Đặt prefab vào trong thư mục Resources.
Để tạo các brush, hãy quay lại script PaintingTexture.cs và thêm các dòng sau:
public GameObject brushContainer; //our container for the brushes painted public float brushSize = 1.0f; public Color brushColor = Color.grey; private Object resourceBrush; void Start() { resourceBrush = Resources.Load("BrushEntity"); // địa chỉ sau thư mục Resources/Tên object. } void InstantiateNewBrush(Vector2 _uvWorldPos) { GameObject brushObj; brushObj = (GameObject)Instantiate(resourceBrush); //Paint a brush brushObj.GetComponent().color = brushColor; //Set the brush color brushColor.a = brushSize * 2.0f; // Brushes have alpha to have a merging effect when painted over. brushObj.transform.parent = brushContainer.transform; //Add the brush to our container to be wiped later brushObj.transform.localPosition = _uvWorldPos; //The position of the brush (in the UVMap) brushObj.transform.localScale = Vector3.one * brushSize;//The size of the brush }
Đây là hàm sinh các brush tại vị trí uv map chúng ta có được ở mục 1. Chúng ta có thể set màu và kích thước brush tại inspector. Tuy nhiên, chúng ta cần phải lưu ý khi sinh càng nhiều object, số lượng draw call sẽ rất lớn, điều này sẽ ảnh hưởng khá nhiều đến hiệu năng. Để giải quyết nó, chúng ta sẽ cần giới hạn số lượng brush. Tiếp tục trong script PaintingTexture.cs, thêm các dòng sau:
public RenderTexture canvasTexture; // Render Texture that looks at our Base Texture and the painted brushes public Material baseMaterial; // The material of our base texture (Were we will save the painted texture) private bool saving; private int brushCounter = 0; void Start() { resourceBrush = Resources.Load("BrushEntity"); // địa chỉ sau thư mục Resources/Tên object. baseMaterial.mainTexture = canvasTexture; } //Sets the base material with a our canvas texture, then removes all our brushes void SaveTexture() { brushCounter = 0; RenderTexture.active = canvasTexture; Texture2D tex = new Texture2D(canvasTexture.width, canvasTexture.height, TextureFormat.RGB24, false); tex.ReadPixels(new Rect(0, 0, canvasTexture.width, canvasTexture.height), 0, 0); tex.Apply(); RenderTexture.active = null; baseMaterial.mainTexture = tex; //Put the painted texture as the base foreach (Transform child in brushContainer.transform) {//Clear brushes Destroy(child.gameObject); } Invoke("ResetTexture", 0.1f); } void ResetTexture() { saving = false; }
Cuối cùng, sử dụng các hàm chức năng bên trên để tô màu tại vị trí làm lõm:
const int MAX_BRUSH_COUNT = 1000; void PaintColor() { if (saving) return; Vector3 uvWorldPosition = Vector3.zero; if (HitTestUVPosition(ref uvWorldPosition)) { InstantiateNewBrush(uvWorldPosition); } brushCounter++; //Add to the max brushes if (brushCounter >= MAX_BRUSH_COUNT) { //If we reach the max brushes available, flatten the texture and clear the brushes saving = true; Invoke("SaveTexture", 0.1f); }
Bạn có thể giới hạn số lượng brush. Tại hàm Update() hãy gọi hàm PaintColor() để thực hiện tô màu tại real time. Tuy nhiên, tuỳ thuộc vào target device của bạn, hãy giới hạn tần suất gọi hàm PaintColor().
Update lại collider cho mesh của Terrain
Sau khi làm lõm và tô màu Terrain, chúng ta cần update lại collider cho mesh của Terrain. Để update lại collider, quay trở lại hàm DeformableMesh.cs và thêm các dòng sau:
private MeshCollider meshCollider; void Start() { meshCollider = GetComponent(); MeshRegenerated(); } void Update() { if(updateCollider) { timeUpdate += Time.deltaTime; } if(timeUpdate >3) { UpdateMeshCollider(); updateCollider = false; timeUpdate = 0; } } private void UpdateMeshCollider() { meshCollider.sharedMesh = null; meshCollider.sharedMesh = meshFilter.mesh; }
Công việc thực hiện update lại mesh collider khá tốn tài nguyên. Do vậy, việc này không thể được thực hiện một cách thường xuyên và chúng ta cũng nên tránh gọi nó cùng lúc với các công việc làm lõm và tô màu. Cuối cùng, thêm dòng
updateCollider = true;
vào trong hàm AddDepression() để xác định thời điểm update mesh collider.
Tài liệu tham khảo
https://codeartist.mx/dynamic-texture-painting/ https://www.youtube.com/watch?v=l_2uGpjBMl4


